Class 37: Docker & Containerization
A common challenge in software development is ensuring that an application runs consistently across different environments (developer's machine, testing server, production server). This is often referred to as the "It works on my machine!" problem. Containerization, with Docker as its leading platform, solves this by packaging an application and all its dependencies into a single, isolated unit.
What is Containerization?
-
The problem: "It works on my machine!"
Differences in operating systems, library versions, runtime environments, and configurations can lead to applications behaving differently or failing when moved from one environment to another.
-
Concept of containers:
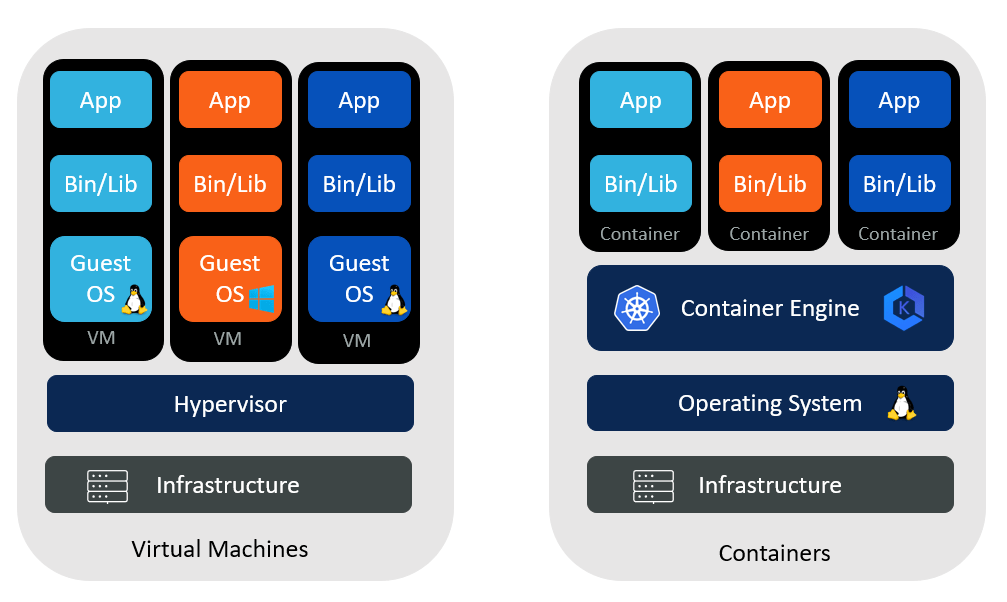
A container is a lightweight, standalone, executable package of software that includes everything needed to run an application: code, runtime, system tools, system libraries, and settings. Containers virtualize the operating system, allowing you to run multiple isolated user-space instances on a single host.
-
Comparison: Containers vs. Virtual Machines
(VMs):
Both provide isolation, but they do so differently.
Feature Virtual Machines (VMs) Containers Isolation Level Hardware virtualization. Each VM runs a full guest OS. OS-level virtualization. Share the host OS kernel. Size Large (GBs), includes full OS. Small (MBs), only includes app and dependencies. Startup Time Slow (minutes), boots full OS. Fast (seconds), lightweight. Resource Usage High (each VM has dedicated resources). Low (share host resources, more efficient). Portability Less portable, tied to hypervisor. Highly portable, runs consistently anywhere Docker is installed.

Introduction to Docker
Docker is the world's leading software containerization platform. It enables developers to build, ship, and run applications in containers.
-
Docker Engine:
The core of Docker. It's a client-server application with a daemon (the Docker server) and a CLI (command-line interface) client that communicates with the daemon.
-
Docker Images:
Read-only templates used to create containers. An image contains the application code, libraries, dependencies, and configuration needed to run the application. Images are built from a
Dockerfile. -
Docker Containers:
Runnable instances of Docker images. You can start, stop, move, or delete a container. They are isolated from each other and from the host system.
-
Docker Hub:
A public registry for Docker images. You can find official images for operating systems, programming languages, and popular software, or store your own custom images.
Basic Docker Commands
First, ensure you have Docker Desktop installed (includes Docker Engine, CLI, Docker Compose).
-
docker --version: Check Docker installation. -
docker pull <image_name>: Download an image from Docker Hub.docker pull node:18-alpine docker pull mongo docker images: List local images.docker ps: List running containers.-
docker ps -a: List all containers (running and stopped). -
docker stop <container_id>: Stop a running container. -
docker rm <container_id>: Remove a container. -
docker rmi <image_id>: Remove an image.
Creating a Dockerfile for a Node.js Application
A Dockerfile is a text file that contains a sequence of commands that Docker uses to build an image.
Let's create a Dockerfile for a simple Node.js Express app.
# Dockerfile for a Node.js Express app

# Stage 1: Build Stage (for installing dependencies)
FROM node:18-alpine AS builder

# Set the working directory inside the container
WORKDIR /app

# Copy package.json and package-lock.json (or yarn.lock)
# to leverage Docker's caching for dependencies
COPY package*.json ./

# Install dependencies
RUN npm install

# Copy the rest of the application code
COPY . .

# Stage 2: Production Stage (for running the application)
FROM node:18-alpine

# Set the working directory
WORKDIR /app

# Copy only the necessary files from the builder stage
COPY --from=builder /app/node_modules ./node_modules
COPY --from=builder /app/.env ./.env # If you use .env in production (though not recommended)
COPY --from=builder /app/server.js ./server.js
COPY --from=builder /app/package.json ./package.json # Keep package.json for npm start
# Copy other app files like routes, models, config, etc.
COPY --from=builder /app/config ./config
COPY --from=builder /app/models ./models
COPY --from=builder /app/middleware ./middleware
COPY --from=builder /app/utils ./utils
COPY --from=builder /app/knexfile.js ./knexfile.js
COPY --from=builder /app/db ./db

# Expose the port your app runs on
EXPOSE 3000

# Command to run the application when the container starts
CMD ["node", "server.js"]
Key Dockerfile Instructions:
-
FROM: Specifies the base image (e.g.,node:18-alpineis a small, secure Node.js image). -
WORKDIR: Sets the working directory for anyRUN,CMD,ENTRYPOINT,COPY, orADDinstructions. -
COPY: Copies files from your host machine into the image. -
RUN: Executes commands during the image build process (e.g., installing dependencies). -
EXPOSE: Informs Docker that the container listens on the specified network ports at runtime. (It doesn't actually publish the port). -
CMD: Provides default commands for an executing container. Only the lastCMDin a Dockerfile will be executed. -
.dockerignore:Similar to
.gitignore, this file specifies files and directories that should be excluded when building the Docker image. This helps keep your images small and secure.# .dockerignore example node_modules npm-debug.log .git .gitignore Dockerfile README.md
Building and Running the Docker Image:
# Build the Docker image (from the directory containing Dockerfile)
# -t: tag the image with a name (e.g., my-node-app)
# .: build context (current directory)
docker build -t my-node-app .

# Run the Docker container
# -p 3000:3000: map host port 3000 to container port 3000
# --name: give a name to your container
# my-node-app: the image name to run
docker run -p 3000:3000 --name my-running-app my-node-app
Now, your Node.js application is running inside a Docker
container, isolated from your host system! You can access it via
http://localhost:3000.
Multi-Stage Docker Builds
The Dockerfile above uses a multi-stage build. This is a best practice to create optimized and smaller production images.
- Problem: If you install development dependencies (like build tools, testing frameworks) in your final image, it becomes unnecessarily large.
-
Solution: Use multiple
FROMstatements. One stage (the "builder") handles all build-time dependencies and compilation. The final stage copies only the necessary artifacts from the builder stage, resulting in a much smaller and leaner production image.
Docker Networking
Docker containers can communicate with each other. By default, containers on the same Docker network can resolve each other by their container names.
- Default bridge network: When you run containers without specifying a network, they connect to the default bridge network.
-
Connecting containers: If you have a
Node.js API in one container and a PostgreSQL database in
another, they can communicate.
# Start postgres container
docker run --name my-postgres -e POSTGRES_PASSWORD=mysecretpassword -p 5432:5432 -d postgres

# Start your node app container and link it to the postgres container
# --link is legacy, but demonstrates the concept. Docker Compose is better.
docker run --name my-node-app --link my-postgres:db -p 3000:3000 my-node-app
# Inside my-node-app, you can now connect to 'db' (the alias) on port 5432
Managing Persistent Data with Docker Volumes
Containers are designed to be ephemeral (temporary). If you stop and remove a container, any data written inside it is lost. To persist data (e.g., for databases), you use Docker Volumes.
- Why persist data? Databases, user uploads, logs – any data that needs to survive container restarts or deletions.
- Volumes: The preferred mechanism for persistent data storage. Volumes are managed by Docker and are independent of the container's lifecycle.
-
Mounting volumes to containers:
# Named volume for PostgreSQL data
docker volume create pgdata

# Run PostgreSQL container with a named volume
docker run --name my-postgres-db -e POSTGRES_PASSWORD=mysecretpassword -p 5432:5432 -d -v pgdata:/var/lib/postgresql/data postgres
Introduction to Docker Compose
For multi-container applications (like a backend API, a
database, and a frontend server), manually managing individual
docker run commands becomes tedious.
Docker Compose is a tool for defining and
running multi-container Docker applications.
-
docker-compose.ymlfile:You define your application's services, networks, and volumes in a single YAML file.
# docker-compose.yml version: '3.8' services: backend: build: . # Build from the Dockerfile in the current directory ports: - "3000:3000" environment: NODE_ENV: development PORT: 3000 MONGO_URI: mongodb://database:27017/book_api_db # 'database' is the service name JWT_SECRET: supersecretjwtkeythatshouldbeverylongandrandom JWT_EXPIRE: 1h JWT_REFRESH_EXPIRE_DAYS: 7 depends_on: - database # Ensure database starts before backend volumes: - .:/app # Mount current directory to /app in container (for development) - /app/node_modules # Exclude node_modules from host mount database: image: mongo:latest # Use the official MongoDB image ports: - "27017:27017" volumes: - mongo-data:/data/db # Persistent volume for MongoDB data volumes: mongo-data: # Define the named volume -
docker-compose up:Starts all services defined in your
docker-compose.ymlfile. It builds images if needed, creates networks, and starts containers.docker-compose up -d # -d for detached mode -
docker-compose down:Stops and removes containers, networks, and volumes created by
up.docker-compose down
Introduction to CI/CD with Docker (Conceptual)
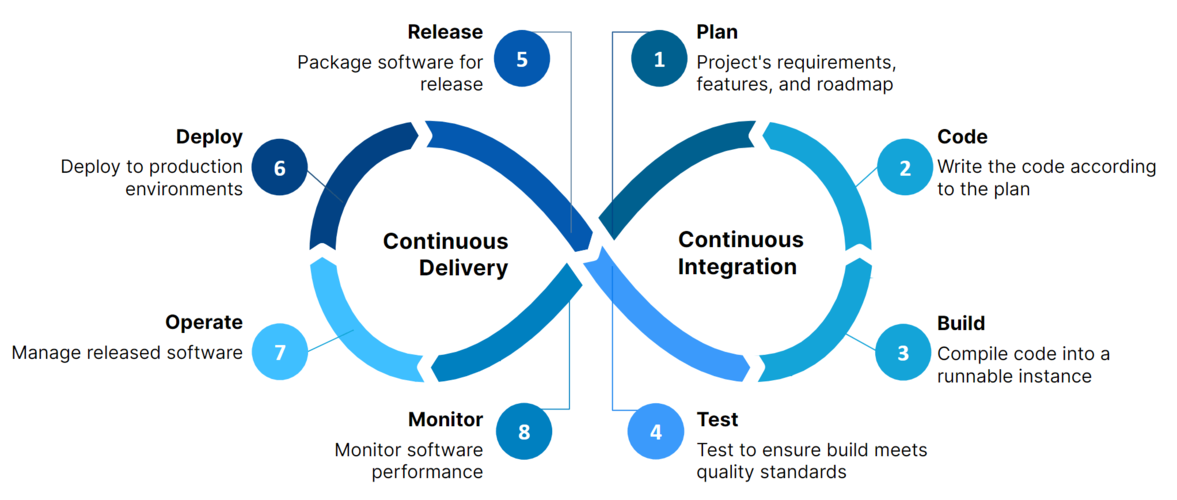
Continuous Integration (CI) and Continuous Delivery/Deployment (CD) are practices that automate the software release process. Docker plays a crucial role in enabling CI/CD pipelines.
-
Continuous Integration (CI):
Developers frequently merge their code changes into a central repository. Automated builds and tests are run after each merge to quickly detect and address integration issues.
Docker's role: CI servers can build Docker images of your application, ensuring that the build process is consistent and reproducible.
-
Continuous Delivery (CD):
An extension of CI where code changes are automatically built, tested, and prepared for a release to production. It ensures that the software can be released reliably at any time.
-
Continuous Deployment (CD):
Further automates CD by automatically deploying every change that passes all tests to production, without manual intervention.

-
Benefits of CI/CD:
- Faster and more frequent releases.
- Fewer bugs in production due to early detection.
- Improved collaboration among development teams.
- Reduced manual errors.
-
Tools:
- GitHub Actions: Built-in CI/CD for GitHub repositories.
- GitLab CI/CD: Integrated CI/CD for GitLab.
- Jenkins: Open-source automation server.
- CircleCI, Travis CI, AWS CodePipeline: Other popular CI/CD services.
These tools can be configured to build your Docker images, push them to a registry (like Docker Hub or AWS ECR), and then deploy them to your cloud infrastructure.
Docker and containerization are transformative technologies that have revolutionized how applications are developed, shipped, and run. They provide consistency, efficiency, and scalability, making them indispensable for modern full-stack development. In the next class, we'll explore Serverless Functions, another powerful cloud deployment paradigm.
