Class 33: Advanced Authentication & Authorization (JWT Refresh Tokens, RBAC)
In the previous class, we built a basic JWT-based authentication system. Today, we'll enhance its security and functionality by introducing JWT Refresh Tokens and implementing Role-Based Access Control (RBAC). We'll also briefly touch upon OAuth 2.0 and security best practices.
JWT Refresh Tokens
A common challenge with JWTs is balancing security and user experience.
-
Problem:
- Short-lived access tokens: More secure, but users have to log in frequently, which is bad for UX.
- Long-lived access tokens: Better UX, but a security risk if the token is compromised (attacker has access for a long time).
-
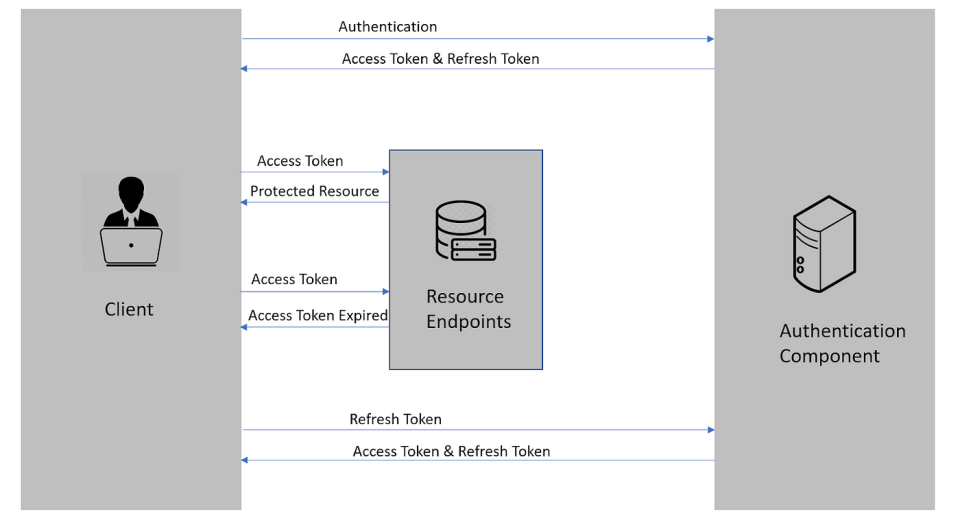
Solution: Refresh Token Flow:
This pattern uses two types of tokens:
- Access Token: Short-lived (e.g., 15 minutes to 1 hour). Used to access protected API resources. If compromised, its validity window is small.
- Refresh Token: Long-lived (e.g., days, weeks, or months). Used only to obtain a new access token when the current one expires.

Implementing the Refresh Token Flow:
We'll need to store refresh tokens securely, typically in the database, and associate them with a user. We'll also need a new endpoint to handle refresh token requests.
1. Update User Model for Refresh Token
(models/User.js):
Add a field to store refresh tokens and a method to generate them.
// models/User.js (add to userSchema)
// ...
const crypto = require('crypto'); // Built-in Node.js module

const userSchema = mongoose.Schema({
  // ... existing fields (username, email, password, role) ...
  refreshToken: String, // Store the refresh token (or its hash)
  refreshTokenExpire: Date // When the refresh token expires
}, {
  timestamps: true
});

// ... existing pre('save') hook for password hashing ...
// ... existing matchPassword method ...
// ... existing getSignedJwtToken method (for access token) ...

// Method to generate and save refresh token
userSchema.methods.getSignedRefreshToken = function() {
  const refreshToken = crypto.randomBytes(64).toString('hex'); // Generate a random token

  this.refreshToken = refreshToken; // Save the token
  this.refreshTokenExpire = Date.now() + process.env.JWT_REFRESH_EXPIRE_DAYS * 24 * 60 * 60 * 1000; // Set expiry

  return refreshToken;
};

module.exports = mongoose.model('User', userSchema);
Add this to your .env:
# .env
JWT_REFRESH_EXPIRE_DAYS=7 # e.g., 7 days
2. Update Login Endpoint (server.js):
Generate both access and refresh tokens on login.
// server.js (Login endpoint)
// ...
app.post('/api/login', async (req, res) => {
  // ... (existing validation and user lookup) ...

  try {
    const user = await User.findOne({ email }).select('+password');
    if (!user || !(await user.matchPassword(password))) {
      return res.status(401).json({ message: 'Invalid credentials.' });
    }

    // Generate Access Token
    const accessToken = user.getSignedJwtToken();

    // Generate and Save Refresh Token
    const refreshToken = user.getSignedRefreshToken();
    await user.save({ validateBeforeSave: false }); // Save user with new refresh token

    res.status(200).json({
      success: true,
      accessToken,
      refreshToken, // Send refresh token to client
      user: {
        id: user._id,
        username: user.username,
        email: user.email,
        role: user.role
      }
    });

  } catch (error) {
    console.error('Error during login:', error);
    res.status(500).json({ message: 'Internal server error.' });
  }
});
// ...
3. Refresh Token Endpoint (server.js):
// server.js (main file)
// ...
// POST /api/refresh-token - Get a new access token using refresh token
app.post('/api/refresh-token', async (req, res) => {
  const { refreshToken } = req.body;

  if (!refreshToken) {
    return res.status(400).json({ message: 'Refresh token is required.' });
  }

  try {
    const user = await User.findOne({
      refreshToken: refreshToken,
      refreshTokenExpire: { $gt: Date.now() } // Check if refresh token is valid and not expired
    });

    if (!user) {
      return res.status(403).json({ message: 'Invalid or expired refresh token.' });
    }

    // Generate a new access token
    const newAccessToken = user.getSignedJwtToken();

    // Optionally, generate a new refresh token and update in DB for rolling refresh tokens
    // const newRefreshToken = user.getSignedRefreshToken();
    // await user.save({ validateBeforeSave: false });

    res.status(200).json({
      success: true,
      accessToken: newAccessToken,
      // refreshToken: newRefreshToken // If implementing rolling refresh tokens
    });

  } catch (error) {
    console.error('Error refreshing token:', error);
    res.status(500).json({ message: 'Internal server error.' });
  }
});

// ...
4. Implementing Logout (Revoking Refresh Tokens):
On logout, the client should discard both tokens, and the server should invalidate the refresh token in the database.
// server.js (main file)
// ...
// POST /api/logout - Invalidate refresh token
app.post('/api/logout', protect, async (req, res) => { // 'protect' ensures user is logged in
  try {
    const user = await User.findById(req.user.id);
    if (user) {
      user.refreshToken = undefined; // Clear the refresh token
      user.refreshTokenExpire = undefined;
      await user.save({ validateBeforeSave: false });
    }
    res.status(200).json({ success: true, message: 'Logged out successfully.' });
  } catch (error) {
    console.error('Error during logout:', error);
    res.status(500).json({ message: 'Internal server error.' });
  }
});
// ...
Client-side flow for refresh tokens:
-
Client receives
accessTokenandrefreshTokenon login. -
Client uses
accessTokenfor most API calls. -
When an API call returns
401 Unauthorized(due to expired access token):-
Client sends
refreshTokento/api/refresh-token. -
If successful, client receives new
accessToken(and optionally newrefreshToken). -
Client retries the original failed API call with the
new
accessToken. - If refresh fails, client prompts user to log in again.
-
Client sends
Role-Based Access Control (RBAC)
Role-Based Access Control (RBAC) is a method of restricting system access to authorized users. Instead of assigning permissions directly to individual users, permissions are assigned to roles, and users are assigned to roles.
Benefits: Easier management, scalability, and enhanced security.
Implementing Roles:
In our User model, we already added a
role field (e.g., user,
admin).
Creating Authorization Middleware:
This middleware will check if the authenticated user has the required role(s) to access a route.
// middleware/authorize.js
const authorize = (...roles) => { // Accepts multiple roles as arguments
  return (req, res, next) => {
    // req.user is populated by the 'protect' middleware
    if (!req.user || !roles.includes(req.user.role)) {
      return res.status(403).json({
        message: `User role ${req.user ? req.user.role : 'unauthenticated'} is not authorized to access this route.`
      });
    }
    next();
  };
};

module.exports = authorize;
Protecting Routes with RBAC (server.js):
// server.js (main file)
// ...
const protect = require('./middleware/auth');
const authorize = require('./middleware/authorize'); // Import authorize middleware

// Example: Admin-only route to create a new book (only admins can create)
app.post('/api/books', protect, authorize('admin'), async (req, res) => {
  // If we reach here, user is authenticated AND has 'admin' role
  try {
    const newBook = await Book.create(req.body);
    res.status(201).json(newBook);
  } catch (error) {
    // ... error handling ...
  }
});

// Example: Get all users (only admins can see all users)
app.get('/api/users', protect, authorize('admin'), async (req, res) => {
  try {
    const users = await User.find().select('-password'); // Don't send passwords
    res.status(200).json(users);
  } catch (error) {
    console.error('Error fetching users:', error);
    res.status(500).json({ message: 'Internal server error.' });
  }
});

// Example: User can only view their own profile (more granular authorization)
app.get('/api/users/:id', protect, async (req, res) => {
    // User can view their own profile OR if they are an admin
    if (req.user.id === req.params.id || req.user.role === 'admin') {
        try {
            const user = await User.findById(req.params.id).select('-password');
            if (!user) return res.status(404).json({ message: 'User not found.' });
            res.status(200).json(user);
        } catch (error) {
            console.error('Error fetching user:', error);
            res.status(500).json({ message: 'Internal server error.' });
        }
    } else {
        res.status(403).json({ message: 'Forbidden: You can only view your own profile.' });
    }
});

// ...
Test with Postman/Insomnia:
-
Create a user with
role: 'user'and one withrole: 'admin'. - Log in as each user to get their respective tokens.
-
Try accessing
/api/userswith both tokens to see the403 Forbiddenfor regular users and200 OKfor admins.
Overview of OAuth 2.0
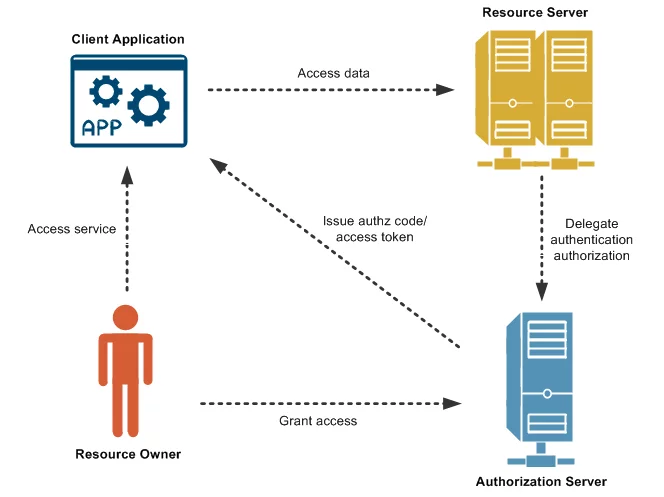
OAuth 2.0 is an authorization framework that enables an application to obtain limited access to a user's account on an HTTP service, such as Google, GitHub, or Facebook. It's about delegated authorization, not authentication.
- Delegated authorization: Allows a third-party application to access a user's resources on another service (e.g., allow a photo printing app to access your Google Photos) without sharing your actual credentials with the third-party app.
-
Roles:
- Resource Owner: The user who owns the data (e.g., you).
- Client: The application requesting access to the resource (e.g., the photo printing app).
- Authorization Server: The server that authenticates the resource owner and issues access tokens (e.g., Google's authentication server).
- Resource Server: The server hosting the protected resources (e.g., Google Photos API).
- Common Grant Types: Different flows for different client types (web apps, mobile apps, server-to-server). The most common for web applications is the Authorization Code Grant.

Integrating Third-Party Authentication (Social Login):
For social logins (e.g., "Login with Google"), you typically use OAuth 2.0. Libraries like Passport.js simplify this process in Node.js.
- Passport.js (brief overview): A popular authentication middleware for Node.js. It's flexible and supports various "strategies" (e.g., local username/password, Google, Facebook, GitHub, JWT).
-
General steps for integrating Google/GitHub
login:
-
Register your application with the OAuth provider
(Google, GitHub) to get
client_idandclient_secret. - Redirect user to the provider's authorization page.
- User grants permission on the provider's site.
-
Provider redirects back to your
callback_urlwith anauthorization_code. -
Your server exchanges this
authorization_codefor anaccess_token(and oftenid_token) with the provider. -
Use the provider's
access_tokento fetch the user's profile from the provider's API. - Based on the profile, create a new user in your database or log in an existing one.
- Issue your own JWT to the client for subsequent API calls.
-
Register your application with the OAuth provider
(Google, GitHub) to get
Security Best Practices for APIs
Beyond authentication and authorization, several other practices are crucial for API security:
- HTTPS everywhere: Always use HTTPS to encrypt communication between client and server, protecting data in transit.
- Input validation and sanitization: Validate all incoming data on the server-side to prevent malicious input (e.g., SQL injection, XSS).
-
Rate limiting: Restrict the number of API
requests a user or IP address can make within a given
timeframe to prevent brute-force attacks and abuse.
npm install express-rate-limit -
Cross-Origin Resource Sharing (CORS) setup:
Control which domains are allowed to make requests to your
API.
npm install corsconst cors = require('cors'); app.use(cors()); // Allow all origins (for development) // Or for specific origins: // app.use(cors({ origin: 'http://localhost:5173' })); -
Helmet.js for security headers: A
collection of middleware to set various HTTP headers that
help protect your app from common web vulnerabilities.
npm install helmetconst helmet = require('helmet'); app.use(helmet()); - Preventing SQL injection and XSS attacks: (Covered by using ORMs/Query Builders and proper input sanitization).
- Protecting against brute-force attacks: (Implemented with rate limiting and account lockout strategies).
Implementing these advanced authentication and authorization techniques, along with general security best practices, will significantly strengthen your backend API. In the next class, we'll cover more advanced backend topics like centralized error handling and logging.
