Class 15: Introduction to Frontend Frameworks & React Basics
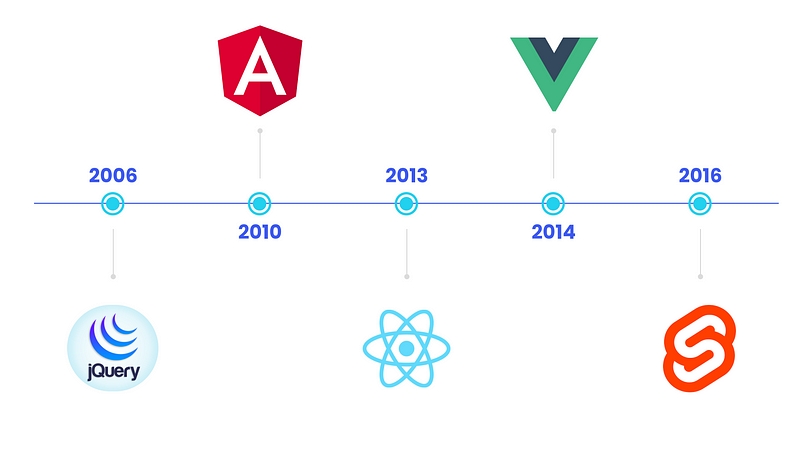
As web applications grew in complexity, relying solely on vanilla JavaScript and direct DOM manipulation became increasingly challenging. This led to a demand for tools that could streamline the development process and provide a more organized, maintainable approach to building user interfaces. The evolution of frontend frameworks can be summarized as follows:
- Simplification with Libraries: In the early phase, libraries like jQuery emerged to simplify complex tasks such as DOM manipulation and event handling, addressing cross-browser compatibility issues and making JavaScript easier to write.
- The Rise of SPAs and Frameworks: The AJAX revolution (mid-2000s) demonstrated the power of dynamic content updates without full page reloads, paving the way for Single Page Applications (SPAs). This led to the creation of full-fledged frameworks like Angular (initially released as AngularJS in 2010), offering a comprehensive structure for building dynamic web applications.
- Component-Based Architecture and Virtual DOM: Released in 2013, React popularized the component-based approach and the Virtual DOM, significantly improving efficiency in updating the UI.
- Progressive Frameworks: Vue.js gained prominence as a progressive framework known for its simplicity and flexibility.
- A Modern Approach with Compilers: More recently, Svelte offers a distinct approach by compiling code into small, vanilla JavaScript bundles at build time, eliminating the need for a runtime framework in the browser and potentially leading to faster performance.

Why Use a JavaScript Framework?
Frontend frameworks offer several significant advantages over traditional approaches:
- Component-Based Architecture: Break down the UI into small, reusable, independent components. This modularity makes code easier to develop, test, and maintain.
- Declarative UI: Instead of manually manipulating the DOM (imperative approach), frameworks allow you to describe what the UI should look like based on data. The framework then efficiently updates the DOM to match your description.
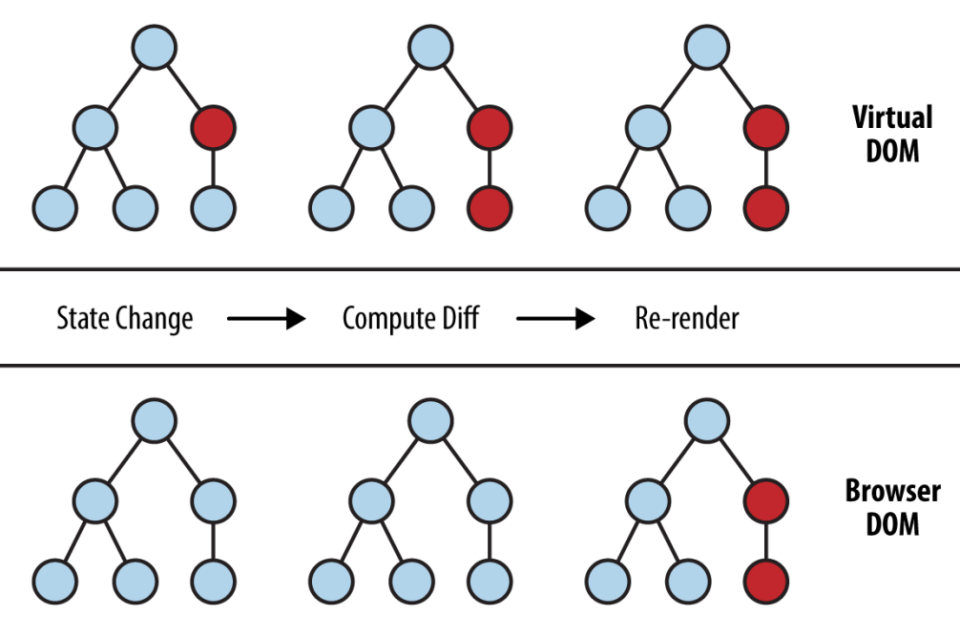
- Efficiency & Performance: Frameworks often employ clever techniques (like React's Virtual DOM) to minimize direct DOM manipulations, leading to faster and more efficient UI updates.
- State Management: They provide robust mechanisms for managing application data (state) that changes over time, making it predictable and easier to debug.
- Scalability: Structured architectures and state management patterns provided by frameworks help manage large codebases and complex application states as the application grows.
- Ecosystem & Community: Frameworks come with rich ecosystems of tools, libraries, and a large community, offering solutions for common development challenges and extensive support.
Introduction to React.js
React is a declarative, efficient, and flexible JavaScript library for building user interfaces. It was developed by Facebook (now Meta) and is one of the most popular frontend frameworks in use today.
Core Concepts of React
- Declarative UI: You tell React what state you want your UI to be in, and React figures out how to get there. This contrasts with imperative programming, where you manually specify each step to achieve a state.
- Component-Based: Everything in React is a component. Components are independent, reusable pieces of UI. They can be simple (e.g., a button) or complex (e.g., an entire page).
- Virtual DOM: React maintains a lightweight representation of the actual DOM in memory, known as the Virtual DOM. When the state of a component changes, React first updates its Virtual DOM, then efficiently calculates the minimal changes needed to update the real DOM. This "diffing" and "reconciliation" process makes React highly performant.
- Unidirectional Data Flow: Data in React typically flows in one direction, from parent components to child components via props. This makes it easier to understand and debug how data changes affect the application.

Setting Up a React Project
While you can set up a React project manually, it's common to use build tools that automate the setup of a robust development environment, including a build system, live reloading, and optimized production builds.
Installing Node.js and npm
React development relies on Node.js and npm (or Yarn). Node.js is a cross-platform, open-source JavaScript runtime environment that executes JavaScript code outside of a web browser. npm (Node Package Manager) is the default package manager for Node.js and the world's largest software registry. It allows developers to easily install, share, and manage project dependencies (third-party libraries and tools). When you install Node.js, npm is usually installed with it.
Action: Download and install Node.js from nodejs.org.
Verify the installation in your terminal by running the following commands:
// Verify the Node.js version:
node -v

// Verify npm version:
npm -v
Using Vite for a React Project
Vite is a modern, fast build tool that provides a leaner and faster development experience for web projects. It's often preferred over older tools like Create React App for new projects due to its speed.
To create a new React project with Vite, you would typically run:
npm create vite@latest myapp -- --template react
cd myapp
npm install
npm run dev
-
npm create vite@latest myapp -- --template react: This command scaffolds a new Vite project namedmyappusing the React template. -
cd myapp: Navigates into the newly created project directory. -
npm install: Installs all necessary dependencies listed inpackage.json. -
npm run dev: Starts the development server, usually accessible athttp://localhost:5173(or another port). This server provides hot-module replacement (HMR), meaning your changes in the code are reflected in the browser instantly without a full page reload.
Exploring the Project Structure
After creating your project with Vite, you'll find a standard directory structure:
my-react-app/
├── node_modules/      <-- Contains all the packages and libraries your project depends on
├── public/            <-- Contains static assets like images and fonts
│   └── vite.svg
├── src/
│   ├── assets/
│   │   └── react.svg
│   ├── App.css
│   ├── App.jsx        <-- Main application component
│   ├── index.css
│   └── main.jsx       <-- Entry point of your React application
├── .gitignore
├── index.html         <-- The main HTML file
├── package.json       <-- Project metadata and dependencies
├── package-lock.json
├── README.md
└── vite.config.js     <-- Vite configuration
-
index.html: This is the single HTML file that your React application "mounts" into. React then takes over rendering the UI within a specific DOM element (usually a<div id="root">). -
main.jsx(orindex.jsx): This is the entry point of your React application. It imports the mainAppcomponent and renders it into the DOM. -
App.jsx: This is your primary React component, where you'll start building your UI. It's often where you define the main layout and structure of your application. -
package.json: This file contains metadata about your project, including its name, version, and a list of all its dependencies (libraries your project needs) and scripts (commands likenpm run dev).
Introduction to JSX
React applications typically use JSX (JavaScript XML), a syntax extension for JavaScript. JSX allows you to write HTML-like code directly within your JavaScript files, making it easier to describe UI components.
Key Features of JSX
-
Syntactic Sugar: JSX is not HTML or a
string. It's a syntactic sugar for
React.createElement()calls. Behind the scenes, your JSX code is transpiled (converted) into regular JavaScript that React can understand. - Declarative UI: It makes it much easier to visualize the UI structure and how it relates to the data and logic in your JavaScript code.
- Expressive: It allows you to write UI components in a way that feels natural and intuitive, combining markup and logic in one place.
- Safety: React DOM escapes any values embedded in JSX before rendering them. This prevents injection attacks like XSS (Cross-Site Scripting).
-
JavaScript Expressions in Curly Braces: You
can embed any valid JavaScript expression inside JSX by
wrapping it in curly braces
{}. -
CamelCase for HTML Attributes: HTML
attributes like
classbecomeclassNamein JSX, andforbecomeshtmlFor, following JavaScript's camelCase convention. -
Self-Closing Tags: Elements that don't have
children (like
<img>,<input>) must be self-closing with a/before the closing angle bracket (e.g.,<img />). -
Single Root Element: A JSX expression must
have exactly one outermost element. If you need to return
multiple elements, you can wrap them in a parent
<div>or use a React Fragment (<></>or<React.Fragment></React.Fragment>). -
Comments: Comments within JSX elements must
be wrapped in curly braces and use JavaScript's multi-line
comment syntax.
{/* ... */}
JSX Examples
// Basic JSX element
const element = <h1>Hello, React!</h1>;
console.log(element);

// Embedding JavaScript expressions
const name = 'World';
const greeting = <p>Hello, {name}!</p>;
console.log(greeting);

// JSX with attributes
const image = <img src="logo.png" alt="React Logo" className="app-logo" />;
console.log(image);

// Multiple elements must be wrapped in a single parent or Fragment
const App = () => (
  <div>
    <h2>My Application</h2>
    <p>This is a paragraph.</p>
  </div>
);

// Using a Fragment for multiple top-level elements without an extra div
const AnotherApp = () => (
  <>
    <h3>Another App</h3>
    <p>No extra wrapper div here.</p>
  </>
);
Mastering JSX is fundamental for writing React components, as it allows for a clear and intuitive way to define the structure and content of your UI directly within your JavaScript code.
Embedding Expressions in JSX
One of the most powerful features of JSX is the ability to embed
any valid JavaScript expression directly within your HTML-like
markup using curly braces {}. This allows you to
render dynamic content, perform calculations, or call functions
directly within your JSX.
function formatUser(user) {
  return user.firstName + ' ' + user.lastName;
}

const user = {
  firstName: 'Jane',
  lastName: 'Doe'
};

const welcomeMessage = <p>Welcome, {formatUser(user)}!</p>;
const sum = <p>The sum of 2 + 3 is: {2 + 3}</p>;
JSX Attributes and Styling
When working with attributes in JSX, there are a few key differences from standard HTML:
-
classNamevs.class: Becauseclassis a reserved keyword in JavaScript, JSX usesclassNamefor applying CSS classes to elements.// In HTML: <div class="container">...</div> // In JSX: const container = <div className="container">My content</div>; -
CamelCase naming convention for HTML
attributes:
Most HTML attributes are written in camelCase in JSX (e.g.,
tabIndexinstead oftabindex,onClickinstead ofonclick). -
Inline styles using JavaScript objects:
To apply inline styles, you pass a JavaScript object where
CSS properties are camelCased (e.g.,
backgroundColor) and values are strings.const myStyle = { color: 'blue', backgroundColor: 'lightgray', fontSize: '16px' }; const styledElement = <p style={myStyle}>This text is styled inline.</p>;
React Fragments
In React, we often need to return multiple elements. However, a
component's render method (or the return of a
functional component) can only return a single element. To solve
this, you typically wrap multiple elements in a parent
<div>. While this works, it adds an extra
node to the DOM, which might not always be desirable for styling
or semantic reasons.
React Fragments allow you to group a list of children without adding extra nodes to the DOM.
-
Syntax: You can use
<React.Fragment></React.Fragment>or the shorthand syntax<></>. -
Benefits: Avoids unnecessary wrapper
<div>elements, which can improve DOM structure and sometimes performance. Useful for layouts with CSS Grid/Flexbox where adding an extra div would break the layout.
import { Fragment } from 'react';

function MyComponent() {
  return (
    <Fragment>
      <h1>Hello</h1>
      <p>This is a paragraph.</p>
      <p>And another one.</p>
    </Fragment>
  );
}
// Or using the shorthand syntax:
// function MyComponent() {
//   return (
//     <>
//       <h1>Hello</h1>
//       <p>This is a paragraph.</p>
//       <p>And another one.</p>
//     </>
//   );
// }

export default MyComponent;
In this example, the <h1> and two
<p> elements are rendered directly into the
DOM without an enclosing <div>.
